Wheelchair accessible kitchen organization is one of the most impactful things you can do to expand a wheelchair user's independence at home — and most of it doesn't require tearing out cabinets or calling a contractor. I work with wheelchair users and their families across the Bay Area, and what I see most often isn't a kitchen that needs a full renovation. It's a kitchen that needs strategic reorganization and a few targeted changes, implemented with a clear understanding of how seated reach actually works.
The standard American kitchen was designed for a standing adult of average height. Countertops are set at 36 inches. Upper cabinets run to 84 inches. Everything is optimized for people who can reach up and bend down freely. For a wheelchair user, that setup is largely inaccessible by default — not because the person can't cook, but because the space was never designed for them.
Here's how to assess and reorganize a kitchen for wheelchair access, starting with the highest-impact changes.
Understanding the Wheelchair Reach Zone
Before moving a single item, it helps to understand the physical reach constraints of a seated position. These are the numbers I work with on every Kitchen Assessment:
- Comfortable reach range: 15–48 inches from the floor
- Maximum comfortable forward reach (over an obstacle like a countertop): 24 inches
- Side reach: slightly better than forward — up to 54 inches from the floor on a clear wall
- Minimum clear floor space for approach: 30 inches x 48 inches in front of any work surface
- Minimum turning radius for a standard wheelchair: 60 inches (5 feet) in diameter
These numbers mean the top shelves of standard kitchen cabinets (typically 60–84 inches from the floor) are completely inaccessible from a wheelchair. The back of a standard 24-inch countertop is at or beyond the comfortable forward reach limit for most seated users.
The 15–48 inch zone is your target for everything used daily. Reorganize around that zone first, and everything else follows.
Countertop Organization: The Most Important Zone
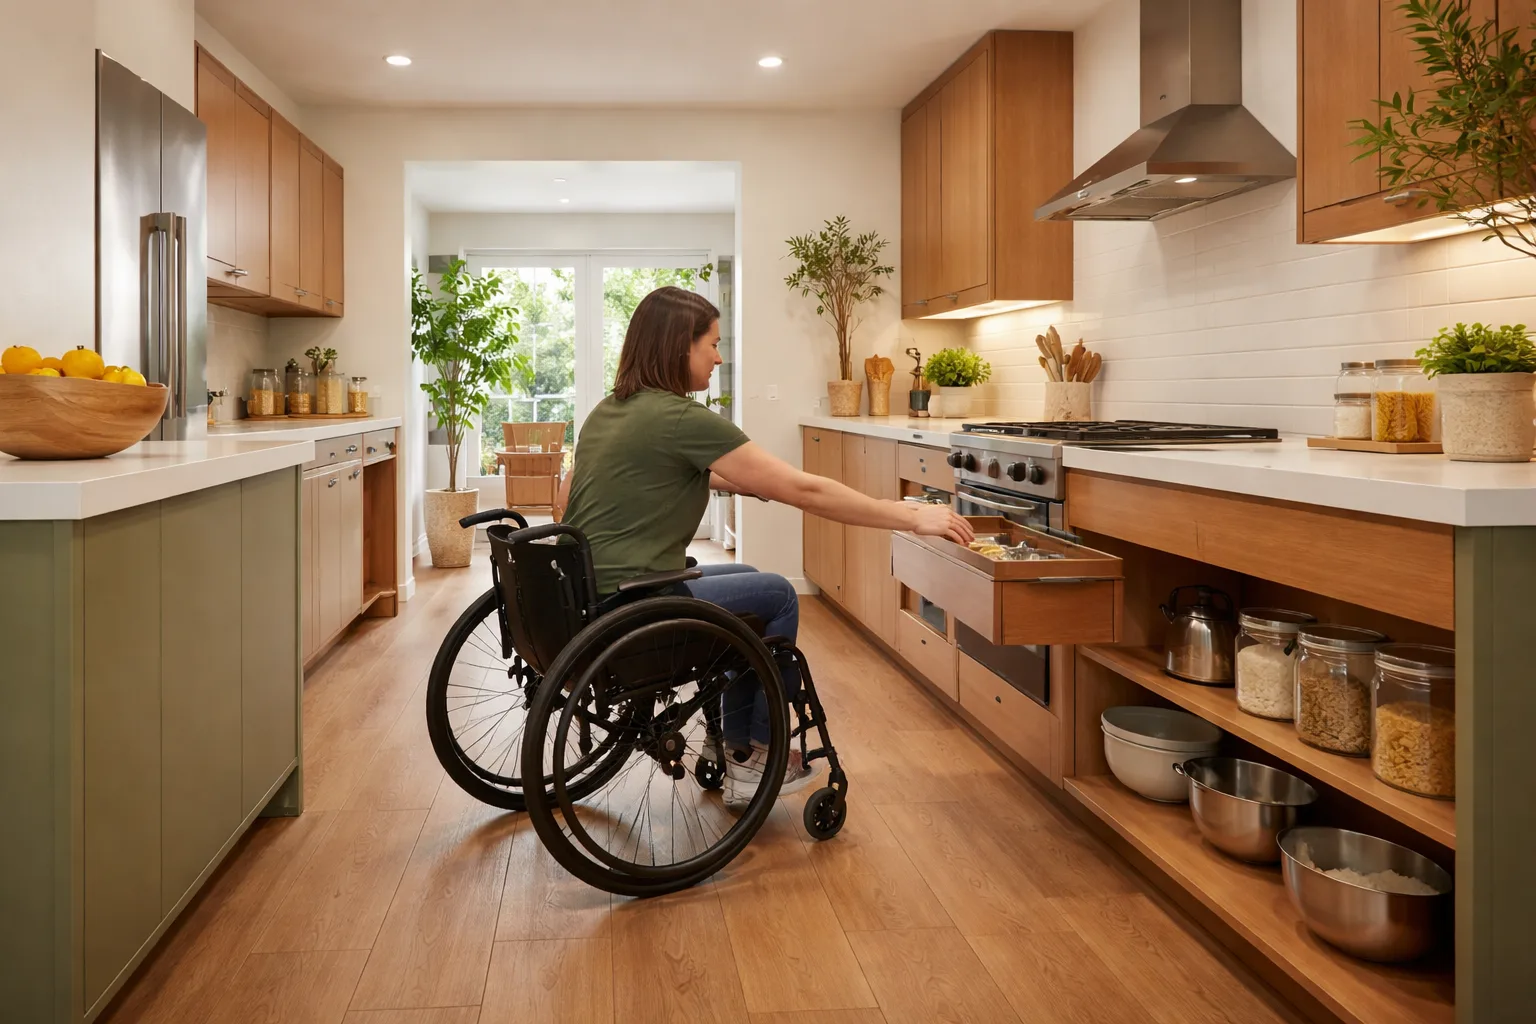
The countertop is the primary workspace. For wheelchair users, the ideal prep surface height is 28–34 inches from the floor (standard countertops are 36 inches). If a renovation isn't possible, working at a slightly elevated counter is manageable with the right technique — but the workspace itself has to be clear and accessible from the front.
Clear a dedicated prep zone. Choose one section of countertop — ideally 24–30 inches wide — and keep it permanently clear. Nothing lives there permanently. This gives a reliable, always-accessible workspace without having to move things first. Sounds obvious; almost no kitchen I've walked into has this set up.
Move frequently used appliances to counter level. The microwave, toaster, coffee maker, and electric kettle should all live on the countertop, not in upper cabinets or on a high shelf. A wall-mounted microwave above the standard counter is not accessible from a wheelchair. A countertop microwave at 28–34 inches is.
Pull-out work surfaces. Many cabinet systems offer pull-out cutting board drawers. Installed at 28–32 inches, these create an accessible lower prep surface without modifying the main counter height — useful in kitchens shared with standing users.
Portable prep cart. In rental kitchens or shared housing where permanent modifications aren't an option, a rolling kitchen cart set at 28–32 inches creates a dedicated accessible prep station for $50–$150. This is the no-landlord-required solution I recommend constantly.
Cabinet Organization: High, Low, and Just Right
Upper Cabinets (Above 48 Inches)
These are largely inaccessible from a wheelchair without assistance. The most practical solution is relocation: move everything stored above 48 inches down to an accessible location. If upper cabinets must be used for storage, limit them to items used infrequently — holiday dishes, specialty appliances, surplus stock.
If you want to maintain some upper cabinet use, pull-down cabinet organizers (hardware stores, ~$80–$200) bring the shelf down to an accessible height when needed. These are worth installing for cabinets that contain items used weekly but not daily.
Lower Cabinets (Floor to 48 Inches)
Lower cabinets are the primary storage zone for wheelchair users, but standard lower cabinet organization creates its own problem: items stack behind each other, requiring reaching past the front row to access the back. Deep lower cabinets are almost useless without interior organization.
Solutions that work:
- Pull-out drawers or roll-out trays inside lower cabinets eliminate the need to reach into the back. This is the single most useful lower cabinet upgrade. Hardware runs $20–$60 per cabinet; installation can be DIY.
- Lazy Susans in corner cabinets make corner storage accessible without arm-contorting reaches around obstacles.
- Full-extension drawer slides allow drawers to pull out completely, making contents visible and reachable from a seated angle.
- Drawer dividers keep items organized and visible — nothing should be buried behind something else in a kitchen organized for accessibility.
Pantry Organization
In a pantry closet, the most accessible zone is middle shelves — roughly 18–48 inches from the floor. Reorganize so the most-used items (cooking oils, vinegars, regularly used canned goods, spices, snacks) live at this height. Less-used items (baking supplies, specialty ingredients, surplus stock) can go higher with clear labeling so you know what's there without close inspection.
Clear bins with labels are your friend here. Being able to see contents from the doorway at seated eye level means not having to enter the pantry and reach around to find things.
Sink Access: The Most Common Problem
A standard kitchen sink has a cabinet base below that blocks wheelchair approach. A wheelchair user at a standard sink is reaching from outside the cabinet footprint, which limits effective reach to the faucet and the nearest basin edge.
Low-cost improvements that don't require cabinet replacement:
- Remove the cabinet doors under the sink — and consider removing the cabinet base entirely if the structure allows — to allow forward wheelchair approach. This one change dramatically improves sink access.
- Insulate exposed pipes with foam pipe insulation (~$5–$10 at any hardware store) to prevent leg burns from hot pipes.
- Install a lever-style faucet to replace a round knob — levers can be operated with a closed fist, a wrist, or minimal grip. Round knobs require fine motor grip. This is a $30–$150 plumbing change that makes a meaningful difference.
- Keep dish soap and sponges at the front edge of the sink, not behind the faucet where reaching past the basin is required.
Refrigerator Configuration
For wheelchair users, refrigerator type matters more than most people realize.
- Side-by-side refrigerators provide accessible shelving on both sides throughout the accessible height range — generally the best option for wheelchair users. You get both fresh food and freezer access without a deep reach into either.
- French door refrigerators with bottom freezers can work well if the fresh food section is at a reasonable height and the freezer pull-out drawer is manageable from seated. Wide door openings also help.
- Bottom-freezer refrigerators put the fresh food section (used daily) at a workable height for seated access — better than top-freezer.
- Top-freezer refrigerators are the least accessible, putting the most-used section at or above chin height from a wheelchair.
Organizing inside the refrigerator:
- Keep all daily-use items on the first shelf — within reach from the door opening without leaning in.
- Use clear containers so contents are visible without moving things to check.
- Stock the lower door shelves with the most frequently reached items (condiments, beverages, cheese).
- The back of any shelf is hard to reach. Keep it for weekly items, not daily ones.
Floor Safety and Navigation
The wheelchair user navigates by wheel, but the kitchen still needs clear, safe passage — for the user, for caregivers, and for any transfer-to-standing moments.
Check for and address:
- Rugs or mats with raised edges that a wheelchair wheel can catch (remove or replace with flush non-slip solutions)
- Appliance cords crossing the floor or hanging at chair height
- Cabinet doors, dishwasher doors, or oven doors when open that reduce the turning radius
- Drawer pulls that protrude at knee height into the roll path
Maintain a minimum 60-inch (5-foot) diameter turning circle somewhere in the kitchen work zone. This is the standard wheelchair turning radius. If the kitchen doesn't have this, it limits independent navigation significantly — and addressing it may mean reconsidering where larger appliances or furniture live.
Appliance Placement: Think in Workflows, Not Individual Items
The real test of a wheelchair-accessible kitchen isn't whether individual items are reachable in isolation. It's whether the full sequence of steps for common tasks is manageable independently.
Coffee making: Coffee maker, mugs, coffee and filters, and the sink should all be within one zone. If the coffee maker is accessible but the mugs are in a cabinet above and the coffee is in a pantry at the far end of the kitchen, the task requires three separate repositioning moves and two out-of-reach items. That's not accessible — even if each individual item could theoretically be reached.
Simple meals: The microwave, plates, cutlery, and a prep area should form one coherent, accessible zone. Frequently used non-perishables (oil, salt, cooking spray, seasoning) should live on the countertop in this zone, not in a cabinet that requires a separate trip.
Dishwashing: A dish drying rack at a reachable height near the sink. If a dishwasher is present, check whether the bottom rack loading position is actually accessible from seated — for many users, a shallow dish rack on the counter is more practical.
This workflow thinking is something I walk through in detail during Kitchen Assessments — it's not obvious from a static picture of the kitchen. You have to trace through the actual task to find the bottlenecks.
Where to Start If a Full Reorganization Feels Overwhelming
If this list feels like too much at once: start with the three or four tasks done every single day. For most people, that's making coffee or tea, preparing or reheating breakfast, and making a simple lunch or snack. Map out every item involved in those tasks and make sure each one is inside the reach zone.
That alone — just solving daily-task accessibility — makes an immediate, meaningful difference in independence and reduces the need to ask for help for routine things. It also gives you a clear foundation to expand from, systematically, over the following weeks.
For more related content, see the cooking life skills guide for disabled adults in the Bay Area and the kitchen safety tips for elderly parents living alone.
If you'd like hands-on help assessing your kitchen's current accessibility and a prioritized list of changes, book a free Kitchen Assessment. I specialize in exactly this kind of practical, high-impact kitchen organization work in the San Francisco Bay Area, and I'm glad to walk through your specific setup.
Frequently Asked Questions
What is the ideal counter height for wheelchair users?
The standard recommendation for wheelchair-accessible counter height is 28–32 inches from the floor, compared to the standard 36 inches designed for standing adults. This brings the work surface within comfortable reach and allows most wheelchair users to work at the counter without awkward shoulder elevation. When a full counter modification isn't possible, a rolling kitchen cart or pull-out cutting board at the lower height can serve as the primary accessible prep surface.
Do I need to renovate to make a kitchen wheelchair accessible?
No — a full renovation is often not necessary, especially as a first step. Strategic reorganization (moving items into the 15–48 inch accessible reach zone), adding pull-out trays to lower cabinets, moving appliances to counter level, removing the cabinet base under the sink for approach access, and establishing a clear prep zone are all changes that can be made without a contractor. A portable induction burner, a rolling prep cart, and a lever-style faucet can together transform daily kitchen independence for a modest investment.
What refrigerator is best for wheelchair users?
Side-by-side refrigerators are generally the best option for wheelchair users because both the fresh food and freezer sections provide accessible shelving throughout the reachable height range. French door refrigerators (bottom freezer, wide doors) are a good second option. Avoid top-freezer models — they put the most-used fresh food section at or above chin height from a wheelchair, which is inaccessible without standing.
How much clear floor space does a wheelchair need to navigate a kitchen?
A standard wheelchair requires a 60-inch (5-foot) diameter turning circle for full maneuverability. At minimum, there should be 30 inches x 48 inches of clear approach space in front of any work surface being used. Narrow kitchens with galley layouts can be particularly restrictive — in those cases, establishing a clear primary work zone with all frequently needed items within reach at that single location is more practical than trying to navigate the full kitchen independently.
Where can I get a professional kitchen accessibility assessment in the Bay Area?
Well Prepped Life provides in-home Kitchen Assessments in the San Francisco Bay Area specifically for wheelchair users, seniors, and disabled adults. A free assessment covers the full kitchen — reach zones, cabinet organization, appliance placement, workflow analysis — and results in a prioritized, practical list of changes. Book here. For broader assistive technology and home modification guidance, the Center for Independent Living in Berkeley (thecil.org) and the Independent Living Resource Center of San Francisco (ilrcsf.org) both maintain referral resources.
Looking for help with caregiver resources? Learn about our Caregiver Meal Support service →
We'll walk through your specific kitchen situation together — no pressure, no commitment.
Book Your Free Kitchen Assessment